Bunker 2: Difference between revisions
mNo edit summary |
mNo edit summary |
||
| Line 1: | Line 1: | ||
'''Bunker 2''' (Part ii of Mission 5: Servernaya) is the ninth level in [[GoldenEye 007]]. This was the only level that | '''Bunker 2''' (Part ii of Mission 5: Servernaya) is the ninth level in [[GoldenEye 007]]. This was the only level that used the watch magnet attract until the discovery of the Cell Warp. | ||
{|class="wikitable" style="float:right;" | {|class="wikitable" style="float:right;" | ||
Revision as of 19:41, 13 April 2022
Bunker 2 (Part ii of Mission 5: Servernaya) is the ninth level in GoldenEye 007. This was the only level that used the watch magnet attract until the discovery of the Cell Warp.
| Bunker 2 | ||
|---|---|---|

|
Objectives
Agent
- a. Recover CCTV tape
- b. Escape with Natalya
Secret Agent
- a. Compare staff / casualty lists
- b. Recover CCTV tape
- c. Disable all security cameras
- d. Escape with Natalya
00 Agent
- a. Compare staff / casualty lists
- b. Recover CCTV tape
- c. Disable all security cameras
- d. Recover Goldeneye operations manual
- e. Escape with Natalya
Version Differences
- Watch magnet attract will start attracting objects after 60 frames on all versions, i.e. 1 second on NTSC and 1.2 seconds on PAL. This immediate loss of 0.2s alone makes NTSC strongly preferred on all difficulties.
Map
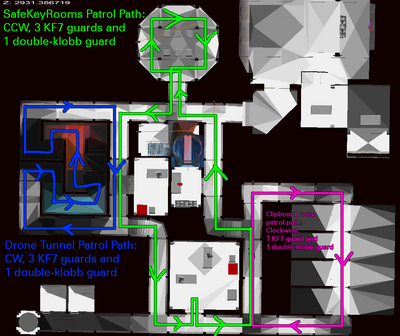
Guard Patrol Paths
Map of guard patrol paths.
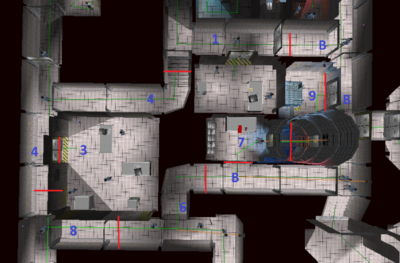
Bunker 2 Sets
Each level is broken up into sets, which are usually large regions of a the map. These are not the same thing as 'rooms' - generally there are a lot more rooms. When a guard needs to plot any route, they first "zoom out" to the level of the sets. They look for a path visiting the least number of sets to get from their set to your set[1].
So on Bunker 2 here's the relevant part of the map broken up into sets:
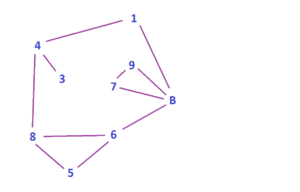
And here's the graph of those sets and how they are linked, which guards plot their routes through
Strategies
Cell Warp
All difficulties of Bunker 2 utilize variants of the Cell Warp. On Agent, it is possible to both warp the cell door and slap the patroling Jailer on the first possible frame you have cleared the cell door for fast item collection and pace. On SA and 00, watching a certain amount of cut scenes and executing consistent warps are required to make specific camera cycles (SA) and guard lures (00).
Clipboard without 2nd Safe Key
The basic idea of the current WR strat is to avoid luring the 2nd safe key guard (in the safe room) while luring the clipboard guard[1].
Clipboard and 2nd Safe Key Lure
The key thing to notice is that if we're in set B / 7 / 9 (or even in the mainframe room since it only links to B), and the key guard is still in 4, then his shortest route is 4 -> 1 -> B, so he's lured around the top[1].
Whereas if he makes it into 8, then we have to be all the way over in 1 to lure him back (not possible).
So the broad idea is:
- Lure the key guard out before we leave set 4
- Lure the clipboard guard out
- Get into B before the key guard reaches his first lure spot
- Key guard is re-lured and we'll meet him later
It's also worth applying this to the clipboard guard.
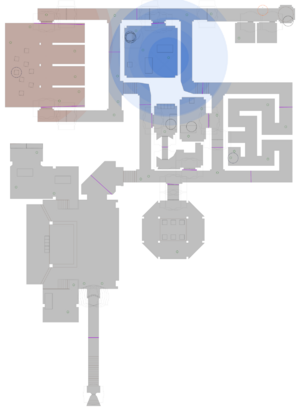
This map that I've generated shows in pale red the circle that you can lure the clipboard guard from at max noise on console (19.85). If you lure him reasonably late (good) then it'll be beyond the purple line, which are the boundaries between set. This means you'll be in set 6 rather than 8, and the clipboard guard will go from 5 -> 8 i.e. through the camera-side door of that big room.
In blue are the hearing distance with 1-6 consecutive kf7 shots of noise in emu. All that's relevant is 3 is going to be too few to practically alert him, and 6 is plenty.
Technical Details
Guards
There are 10 patrolling guards[2].
Tutorials
- General Tips
- You can hold Z as you exit the pause menu to buffer the Watch Magnet, and switch to Unarmed while it's still magnetizing[3].
- Try to position yourself at the cell guard so you're facing Nat's cell and can simply press B and leave after you get the key.
Agent
- General Tips
- One of the keys to the level is going through the tape room fast enough for 0:23 pace but without being too fast for the guard to be out of position. In addition to all that, 23 requires a rare boost[4].
- Tutorials
Secret Agent
- General Tips
- Approach the mainframe room camera from between the pillar and the mainframe so you can hold full speed while shooting it[3].
- Use KF7 for the last camera. Despite having dual Klobbs, they're just too inaccurate to rely on using.
- Tutorials
00 Agent
LTK
- Bunker 2 LTK
- Tutorial Video: - Adam Bozon - Bunker 2 LTK Tutorial (turn captions on)
- Tutorial Video: - Icy - Bunker 2 LTK Tutorial (turn captions on)
DLTK
External Links
References
- ↑ 1.0 1.1 1.2 Whiteted. "the-elite forum Goldeneye facts post on Bunker 2 sets and guard routing". Retrieved July 18, 2021.
- ↑ Icy. "the-elite forum Goldeneye facts post on guard AI". Retrieved July 16, 2021.
- ↑ 3.0 3.1 Icy. "the-elite forum post "Post Runs For Critique Here!"". Retrieved July 19, 2021.
- ↑ flicker. "the-elite forum post "Post Runs For Critique Here!"". Retrieved July 19, 2021.
- ↑ Wyst3r. "the-elite forum post "Post Your Best Legit (And Semi-Legit) Fails Here!"". Retrieved July 19, 2021.
| GoldenEye 007 solo missions |
|---|


