Facility: Difference between revisions
HarryCoupe (talk | contribs) No edit summary |
(Adding Irie never fail tanks tutorial) |
||
| (9 intermediate revisions by 2 users not shown) | |||
| Line 2: | Line 2: | ||
|title= Facility | |title= Facility | ||
|image= Facility_infobox.jpg | |image= Facility_infobox.jpg | ||
|version= NTSC or NTSC-J | |version= [[Version Differences | NTSC or NTSC-J]] | ||
|rankings= [https://rankings.the-elite.net/goldeneye/stage/facility Link] | |rankings= [https://rankings.the-elite.net/goldeneye/stage/facility Link] | ||
}} | }} | ||
| Line 35: | Line 35: | ||
===Agent=== | ===Agent=== | ||
*[[Goldeneye 007 Tutorial: Facility | *General tutorial by [https://www.youtube.com/watch?v=-ssOL4oScoQ Luke] | ||
*Open door tutorial by [https://www.youtube.com/watch?v=Jy-jPdrgZko Yendis] | |||
*Bad trev tutorial by [https://www.youtube.com/watch?v=iPtXpqdAOvg Yendis] | |||
*How to never fail tanks by [https://www.youtube.com/watch?v=bpDhta1zizQ Irie] | |||
===Secret Agent / 00A Agent=== | |||
===LTK=== | |||
*[[Goldeneye 007 Tutorial: Facility LTK|LTK]] | |||
*Tutorial Video: [https://videos.huzip.net/tutorials/goldeneye/ltk-dltk/Adam-Bozon/annotated/Facility%20LTK%20Tutorial.html - Adam Bozon - Facility LTK Tutorial (turn captions on)] | |||
*Tutorial Video: [https://videos.huzip.net/tutorials/perfect-dark/ltk-dltk/Eric-Liikala/annotated/Facility%20LTK%20Tutorial.html - Icy - Facility LTK Tutorial (turn captions on)] | |||
=== | ===DLTK=== | ||
*[[Goldeneye 007 Tutorial: Facility DLTK|DLTK]] | |||
*Tutorial Video: [https://videos.huzip.net/tutorials/goldeneye/ltk-dltk/Adam-Bozon/annotated/Facility%20DLTK%20Tutorial.html - Adam Bozon - Facility LTK Tutorial (turn captions on)] | |||
==External Links== | |||
*[[ | *[https://rankings.the-elite.net/goldeneye/stage/facility Facility World Rankings] | ||
*[https://rankings.the-elite.net/goldeneye/ltk/stage/facility Facility LTK/DLTK Rankings] | |||
*[http://thengamer.com/GE/02-Facility/ Facility Videos] | |||
==Technical Details== | ==Technical Details== | ||
| Line 103: | Line 119: | ||
The script for each of the trio of guards in the hallway after the console controller door is naively written to wait until they see Bond, then walk & shoot, followed by run & shoot, before becoming normal guards. However if you look down heavily then the two charging animations fail and they will fall through to become normal guards. | The script for each of the trio of guards in the hallway after the console controller door is naively written to wait until they see Bond, then walk & shoot, followed by run & shoot, before becoming normal guards. However if you look down heavily then the two charging animations fail and they will fall through to become normal guards. | ||
== | ==Unworkable/Unused Strategies== | ||
=== Decoder door guard lure === | === Decoder door guard lure === | ||
| Line 111: | Line 127: | ||
There's a separate page discussing the technical aspect of the [[Facility Decoder Door Lure|decoder door one guard lure]]. | There's a separate page discussing the technical aspect of the [[Facility Decoder Door Lure|decoder door one guard lure]]. | ||
==External Links== | ==External Links== | ||
*[https://rankings.the-elite.net/goldeneye/stage/facility Facility | *[https://rankings.the-elite.net/goldeneye/stage/facility Facility Rankings] | ||
*[https://rankings.the-elite.net/goldeneye/ltk/stage/facility Facility LTK/DLTK Rankings] | *[https://rankings.the-elite.net/goldeneye/ltk/stage/facility Facility LTK/DLTK Rankings] | ||
| Line 123: | Line 138: | ||
[[Category:GoldenEye 007]] | [[Category:GoldenEye 007]] | ||
{{ | {{GE_nav}} | ||
Latest revision as of 03:06, 15 September 2022
| Facility | |

| |
| Stage Info | |
| Recommended Version | NTSC or NTSC-J |
| Rankings | Link |
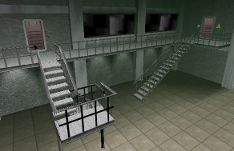
Facility (Part ii of Mission 1: Arkangelsk) is the second level in GoldenEye 007.
Objectives
Agent
- Gain access to laboratory area
- Enter the room with the stairs up. This is the only route to the ending so the objective is trivial.
- Rendezvous with 006
- Completes a fixed time after Trev first greets Bond with "Glad you could make it, 007". This is the bottleneck in the ending, and so this objective should be completed deep into the fade.
- Destroy all tanks in bottling room
- All 10 of them.
- Minimize scientist casualties
- At most 2 scientists (excluding Doak) can be killed.[1] This largely isn't a problem though you can fail it with a poorly placed mine boost upstairs.
Secret / 00 Agent
- Contact double Agent
- The only additional objective on SA / 00A. This requires meeting up with the man himself, Dr Doak, and receiving the door decoder from him[2].
Difficulty Explainations
Agent
- General tutorial by Luke
- Open door tutorial by Yendis
- Bad trev tutorial by Yendis
- How to never fail tanks by Irie
Secret Agent / 00A Agent
LTK
- LTK
- Tutorial Video: - Adam Bozon - Facility LTK Tutorial (turn captions on)
- Tutorial Video: - Icy - Facility LTK Tutorial (turn captions on)
DLTK
- DLTK
- Tutorial Video: - Adam Bozon - Facility LTK Tutorial (turn captions on)
External Links
Technical Details
Facility can experience the Time Not Saved glitch.
Dr. Doak spawn
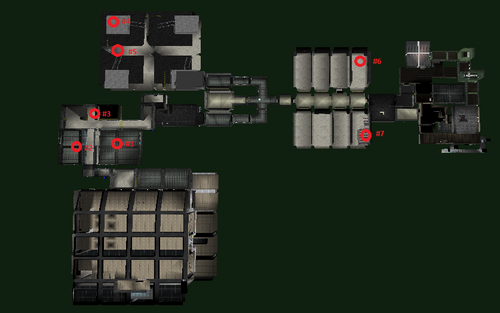
Doak does not spawn until you enter the bathroom. There are 7 locations he can spawn at[3], as pictured:
| Location | Chance, / 256 | Chance, % |
|---|---|---|
| #1 | 36 | 14.1 |
| #7 | 45 | 17.6 |
| other | 35 | 13.7 |
The chances of getting the optimal spawn, #3, is 1 in 7.31.
The 3 better spots have common names, since all are involved in alternate strats:
| Spawn number | Common name |
| #1 | Big lab |
| #2 | Small lab |
| #3 | Best spot |
Dr. Doak sequence
The game checks if Bond is within Doak's line of sight, and if so triggers Doak's walking toward Bond[2]. The conversation is triggered once Bond is within a 2m, and 5 seconds later Doak will give Bond the door decoder, wherever Bond is in the level.
In particular you can 'meet up through the glass' when Doak is in the small lab. This still loses at least 0.30s compared to the best spot even in a TAS setting[4], and would lose even more when compared to 'right strafe Doak'.
Good and Bad Trev
This refers to the position of Trevelyan when Bond enters the bottling area.
For detailed mechanics, see Facility - Good and Bad Trev
Trio after console door
The script for each of the trio of guards in the hallway after the console controller door is naively written to wait until they see Bond, then walk & shoot, followed by run & shoot, before becoming normal guards. However if you look down heavily then the two charging animations fail and they will fall through to become normal guards.
Unworkable/Unused Strategies
Decoder door guard lure
This is a theoretical strategy that lures one of the guards next to the decoder door to open it for you, saving 2-3 seconds. This has only been demonstrated in a TAS. More information in this post.
One guard lure
There's a separate page discussing the technical aspect of the decoder door one guard lure.
